The Oehler Ballistics Explorer program is an advanced external ballistics program that will do the basic tasks we want our ballistics software to do, but it then goes beyond what most alternatives can do in providing some useful advanced features.
One of the common advanced operations we may need to solve is to calculate a ballistic coefficient for a bullet whose manufacturer doesn’t supply one and then use that in determining what our results should be with that bullet in our hand-loads. To provide an example of how to do this with Ballistic Explorer I’m going to choose the German 6.5mm RWS 127grain KS (Cone Point) bullet as used in the RWS 6.5x68mm cartridge. I’m choosing these simply because not so many people are familiar with this caliber and the ballistic coefficient was not published by RWS, when I was loading for it so I had to determine it the old fashioned way using tables, form factor and practical shooting at the range. I’ve also chosen this one because all the factory data is in European Metric system and this gives us an opportunity to see how seamlessly Ballistic Explorer moves between Metric and English systems.

As you can see from the chart above which is taken from the RWS catalog the listed Ballistic Coefficient for the 127 grain (8.2gram) KS bullet is 0.361. But let’s assume this is an unknown quantity as it used to be and that we first have to calculate it in order to work with our hand-loads for this bullet. We also want to move the published data from metric to English measures as used in the US.
First we open Ballistic Explorer and open a Trace. At the moment the program is in English measures so we can enter all the data we know in English measures. This will include sight height which I measured on my rifle as being 1.8″.
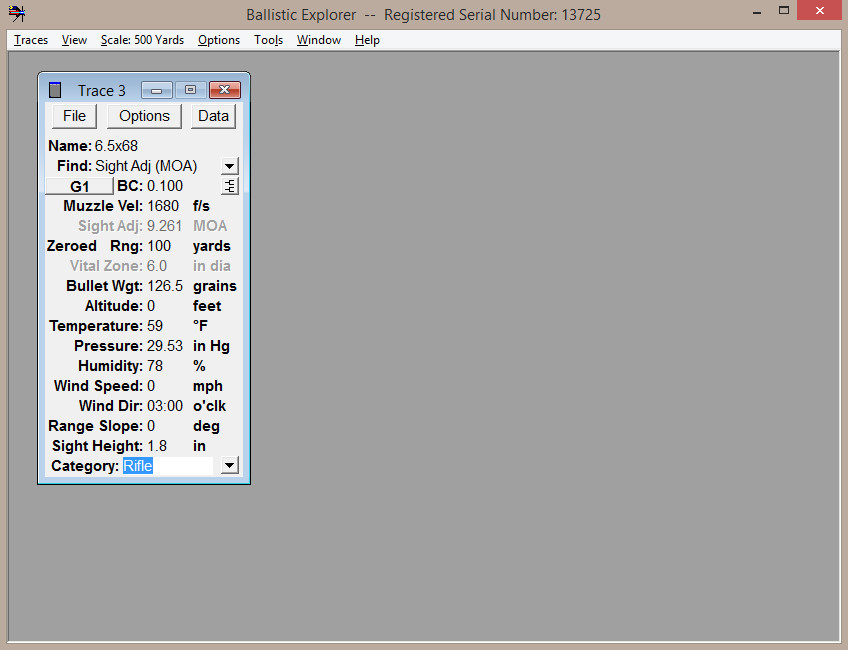
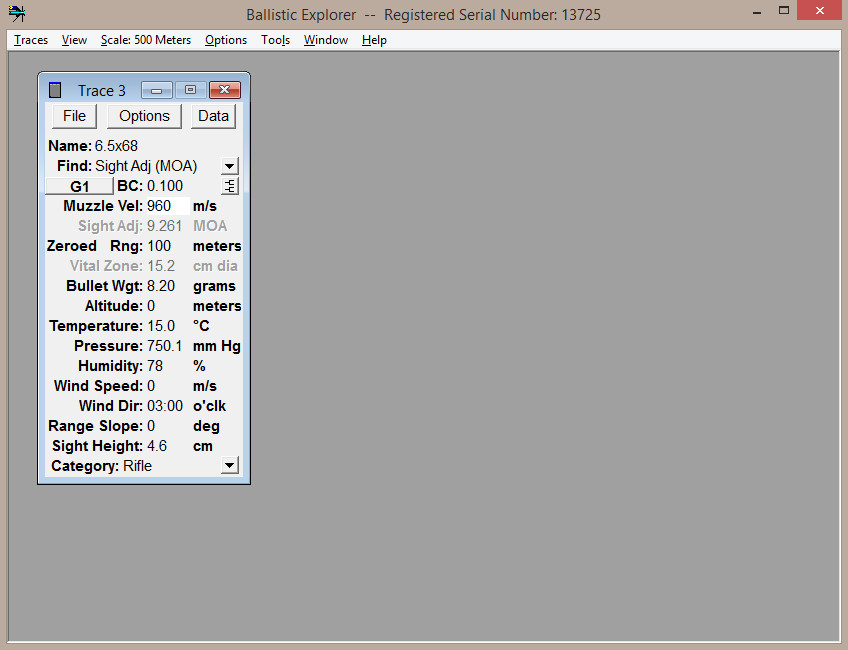
Next we want to enter the data from the RWS catalog which is in Metric measures. so we use the Options menu to switch; all our data is saved and is automatically converted. This requires we restart the program and re-open our trace. Then we enter our Metric data such as our Muzzle Velocity as 960m/s and our range as 100meters. We can leave the Ballistic Coefficient value at its default as this will be calculated later.
Next is to calculate the Ballistic Coefficient. We click the Options button and choose “Calculate Ballistic Coefficient”. A new window pops up and we enter the muzzle velocity and the velocity at another downrange distance such as 300meters, and “voila” it calculates it instantly. Better still the calculated value almost perfectly matches the value listed by RWS.
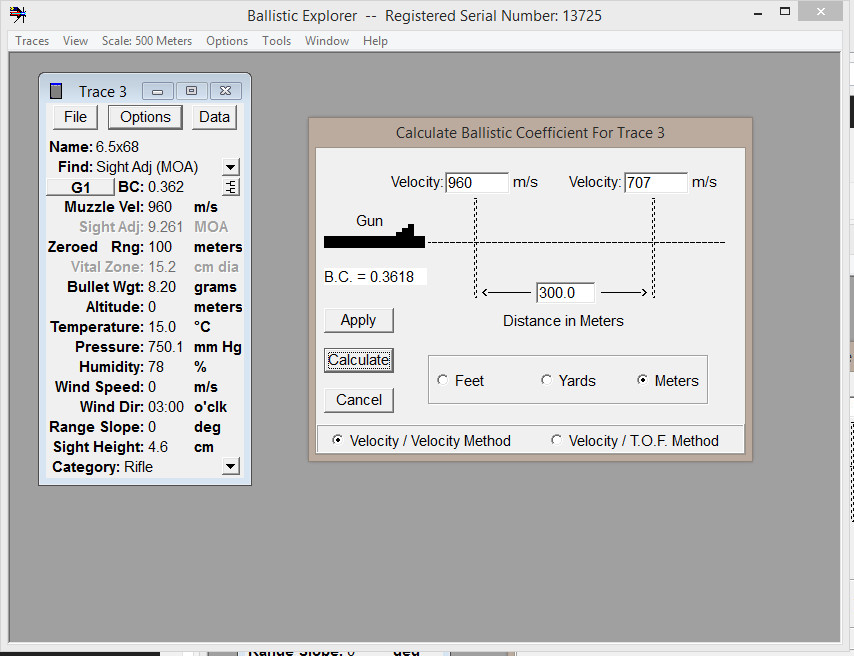
That’s really not “advanced” is it! Once that’s done we can go ahead and work with our bullet and hand-loads as usual. First though lets switch back to English measurements and then set up trajectory and wind drift tables for this loading using the values we want to use.
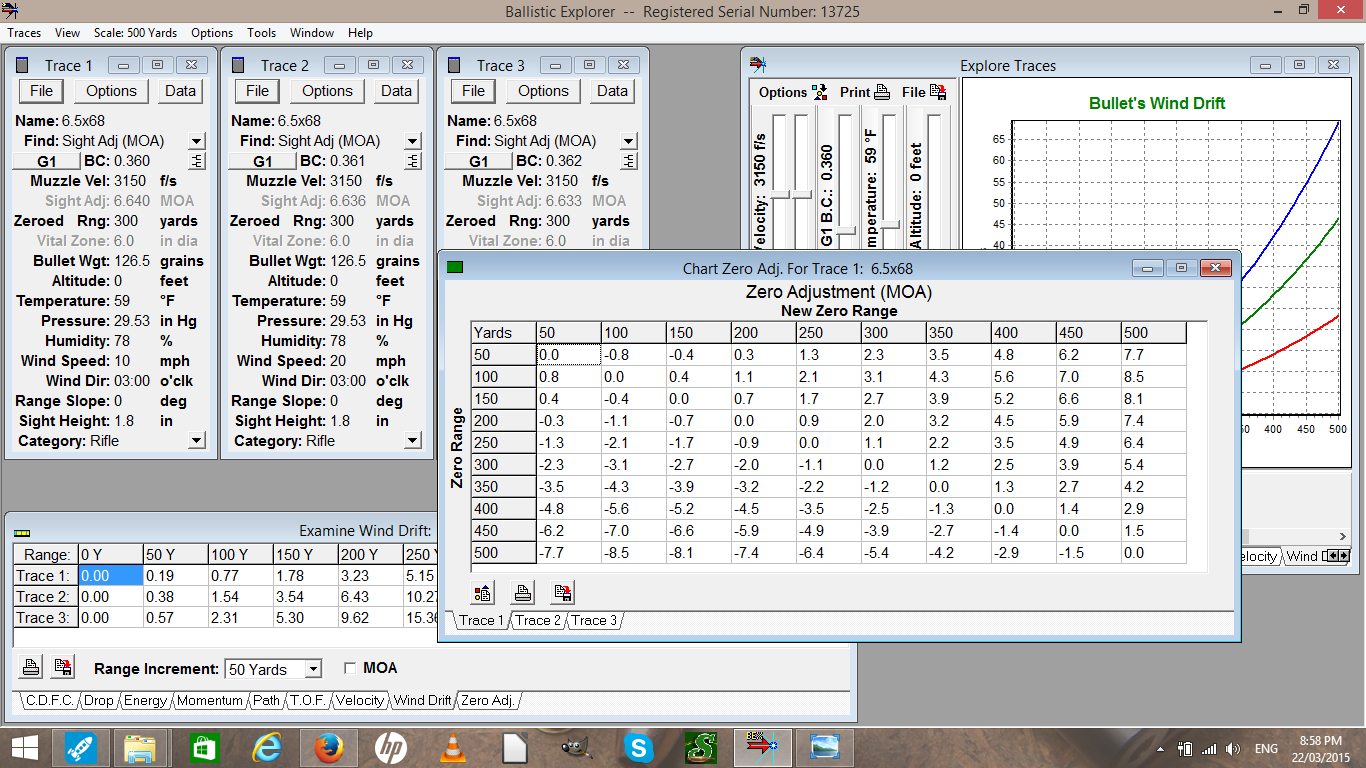
First I use Ballistic Explorer to determine my Maximum Point Blank Range assuming a vital area of 6″. This comes up as just over 300 yards so I choose 300 yards as my zero range. Then I set up the wind drift values I want; 10mph for trace 1, 20mph for trace 2 and 30mph for trace 3. I can then get Ballistic Explorer to calculate my reference tables.
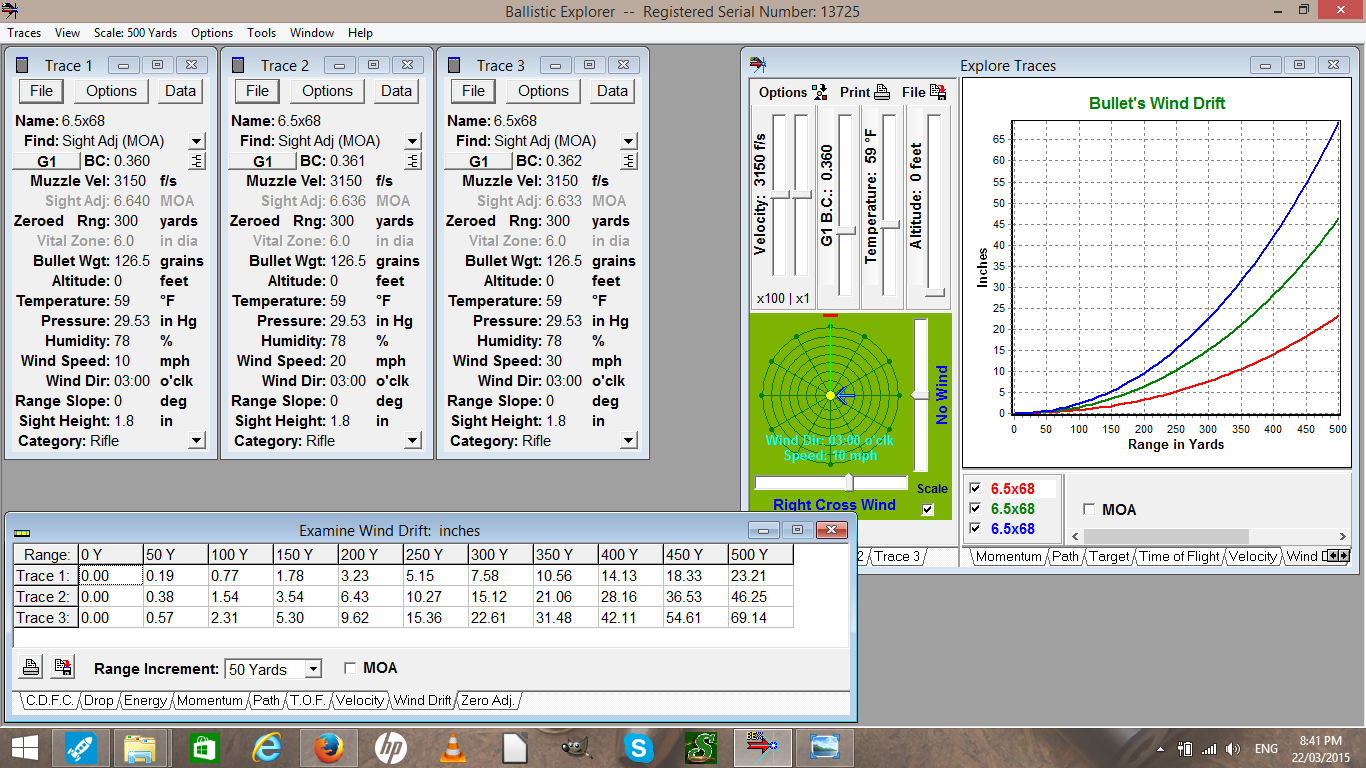
So, with Ballistic Explorer I would be able to determine the Ballistic Coefficient of an unknown bullet as long as I can get accurate velocity figures at two ranges or more. I’ve then been able to move between English and Metric systems seamlessly, calculate a Maximum Point Blank range and set up my trajectory and wind drift tables; and as you can see by the headings on the tabs in the screen shot above there is a lot more information available.
We’ve done a lot with the program; but what is impressive is that there is quite a bit more we can do. Let’s now surmise that we want to try the other factory loading for the 6.5×68, the one using the 93 grain bullet. Can Ballistic Explorer give me a close estimate of what adjustments I may need to make on my rifle-scope to zero this new bullet at 300 yards? Or, alternatively, can Ballistic Explorer tell me at what distance this new loading will zero at if I leave my rifle-scope settings as they are? Yes it can. Let’s do the rifle-scope adjustment calculation first.
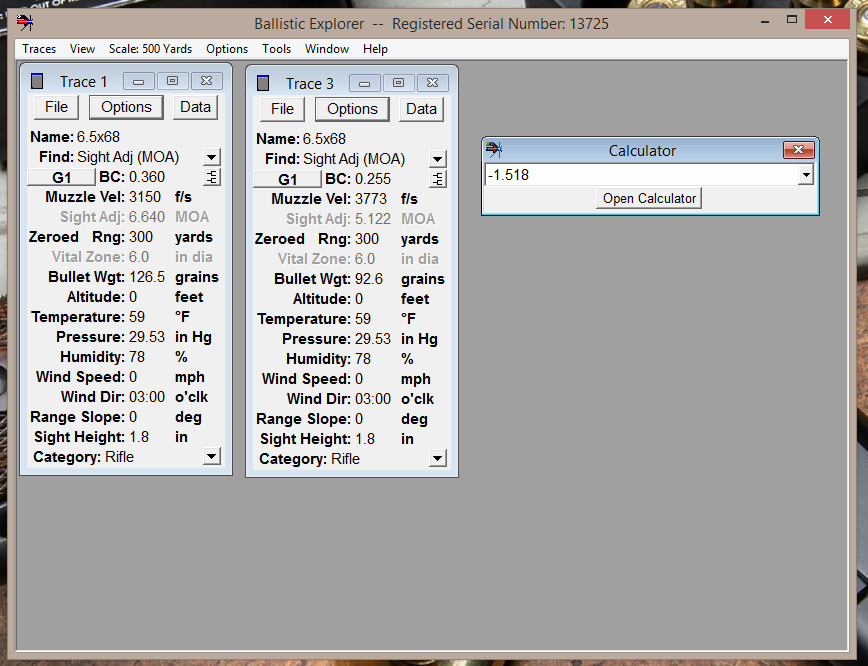
I have my data for the 127 grain KS bullet in Trace 1 and the data for the 93 grain TM in Trace 3. Once I’ve set the traces to “Find Zeroed Range” I use the Options button and tell it to Calculate Trace Values. I can then see the Sight Adjustment value in Trace 1 is 6.604 MOA and for Trace 3 its 5.122 MOA. Our rifle-scope is zeroed for the 127 grain loading in Trace 1 so we subtract the value which our rifle-scope is zeroed from the one we’re planning to try. So we subtract the value of Trace 1 from the desired value in Trace 3 using the built in calculator and we get -1.518. This means we need to adjust our rifle-scope down 1.518MOA. If our rifle-scope has 5 clicks per MOA that means 1.518X5=7 clicks down. If our rifle-scope is one of the old fashioned ones with quarter minute clicks then it would be 1.518X4=6 clicks down.
Next we’ll look at finding out what range the 93 grain bullet will zero at if we leave the sights on the zero settings for 300 yards for the 127 grain bullet.
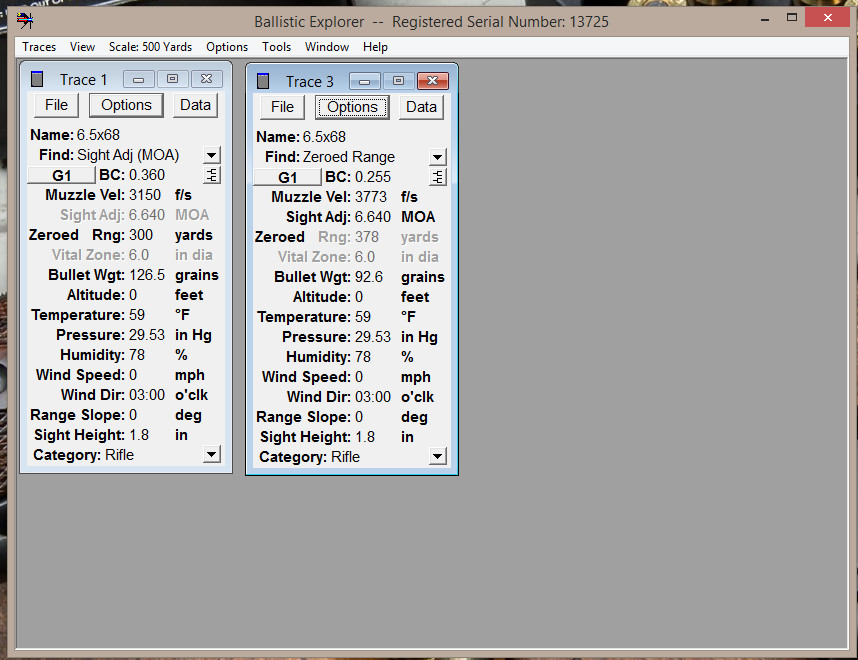
In the above screenshot we have left the Sight Adjustment value the same at 6.640MOA and in Trace 3 calculated the value for Zeroed Range, which is 378 yards. All of these calculations depend on our entering correct values for air pressure, humidity, range slope etc. in order to expect the math to work. This means owning or borrowing the necessary equipment for this. If you plan to do any extended range shooting out beyond 400 yards then you will need this gear along with the means to measure your ammunition temperature and a chronograph to measure your actual muzzle velocity. If, like me, you are primarily a hunter who will be keeping his/her shots under 300-400 yards depending on caliber then that equipment is less necessary, but still good to have.
The main feature windows of Ballistic Explorer
The Ammo Library
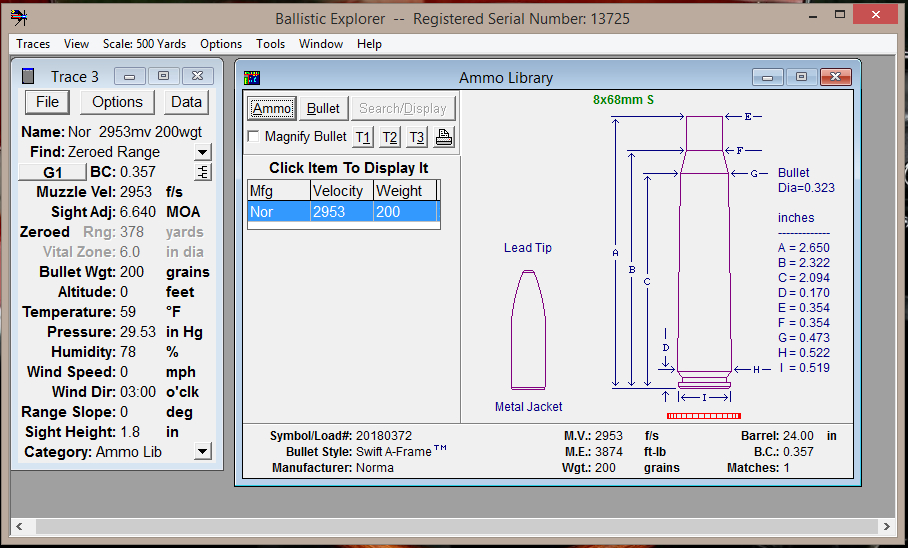
Ballistic Explorer has five windows under the View menu. The first is the Ammo and Bullet library. This library has data on a large range of loaded ammunition and individual bullets. Notable by their absence are RWS ammunition and bullets, however, as we have already seen, it is easy to use Ballistic Explorer to work with unlisted ammunition and bullets. Adding the data for a loaded cartridge or individual bullet is as simple as using the Search/Display button to find it and then just click which trace you would like the data entered into. So here I’ve searched for the Norma loading for the 8x68S, and then just clicked the small “T3” button to load all that data into Trace 3. Very easy and convenient to work with.
Chart Zero Adjustment
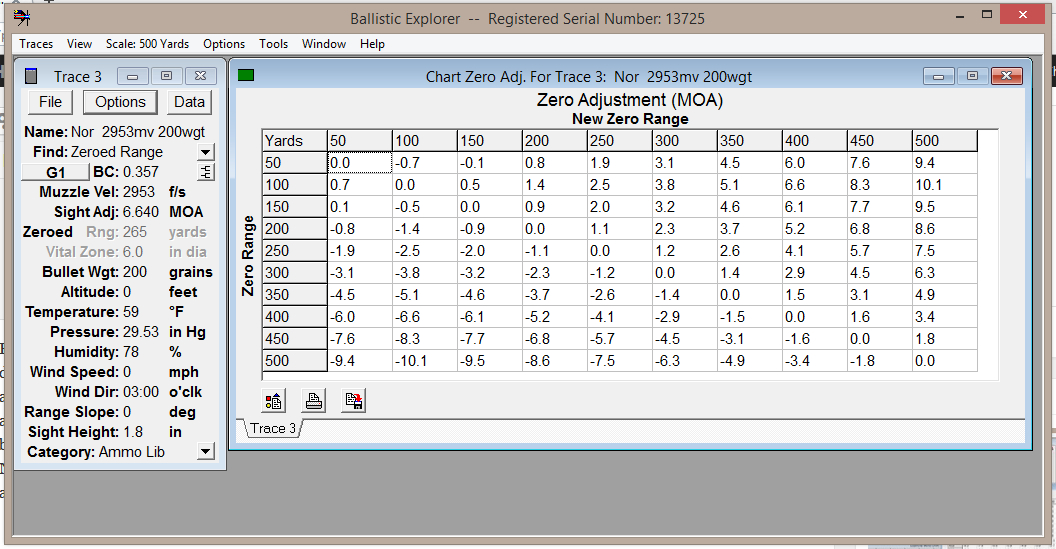
The Chart Zero Adjustment window provides sight adjustment information for the ranges you’ve defined as being the ones you might want to zero at. Here I’ve set the maximum range as 500 yards and am using 50 yard increments. The three buttons at the bottom left are for Controls, Print, and Save to File.
Examine Traces
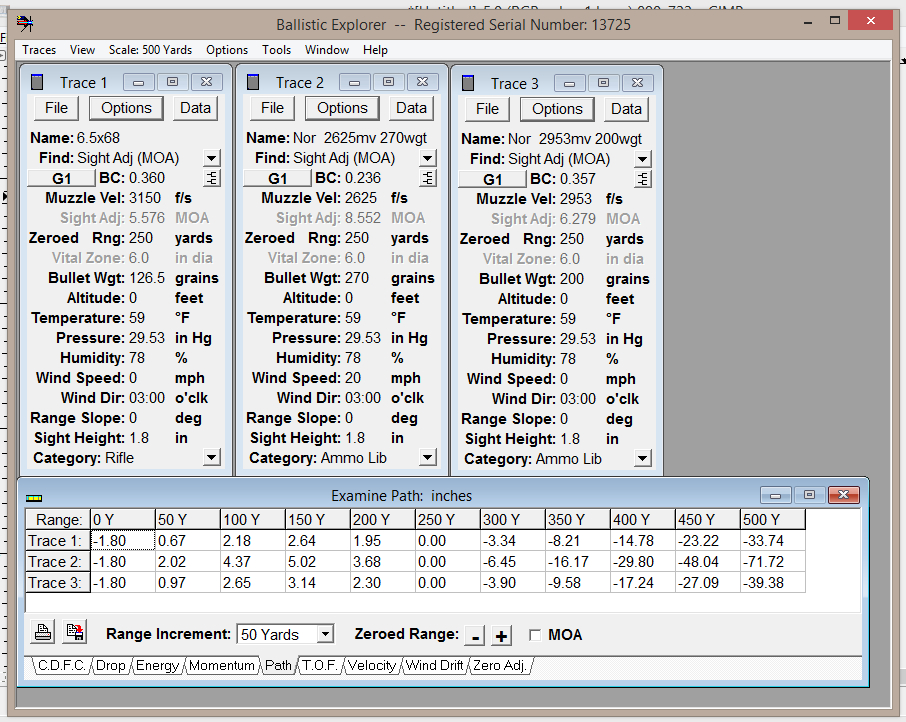
The Examine Traces window allows us to compare data across the three available traces. Here I’ve set Trace 1 for the 6.5×68, Trace 2 for a 250 grain Norma loading for the 375H&H Magnum, and Trace 3 for the Norma Loading for the 8x68S. We are looking at the Path tab. As you can see there are tabs to allow us to compare CDFC (Combined Distance From Center), Drop, Energy, Momentum, Path, TOF (Time Of Flight), Velocity, Wind Drift and Zero Adjustment.
Explore Traces
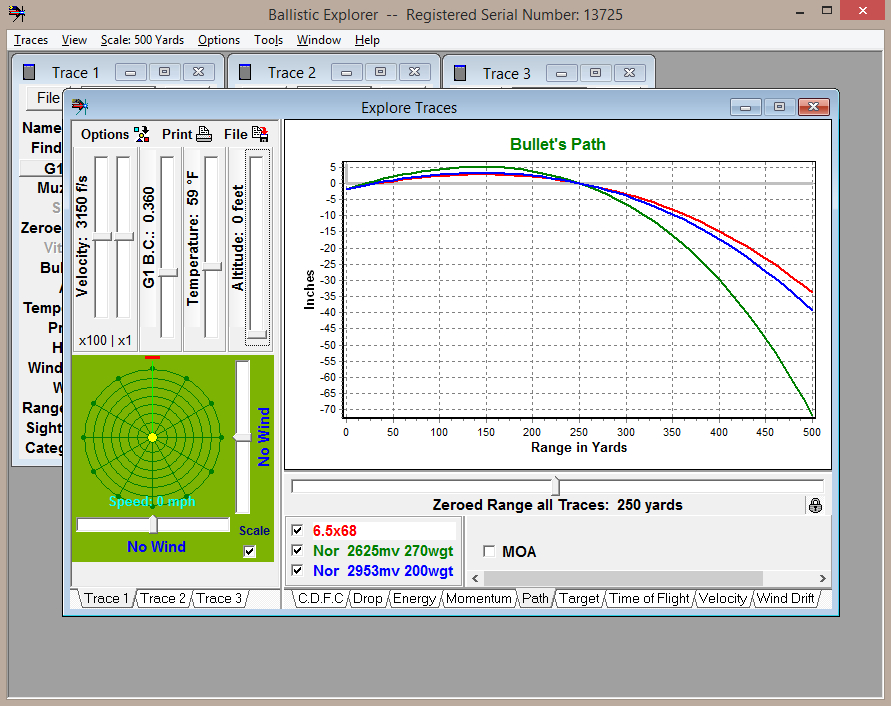
The Explore Traces window is one of the nicest features of Ballistic Explorer. At the top left you can see “slider bars” which you can slide up or down to see what effects raising or lowering Velocity, Ballistic Coefficient, Temperature and Altitude will have on the bullet’s path, wind drift etc. You can see the available tabs for the three Traces and the other information as per the previous dialogue.
To the bottom left of the window is the green clockface type dialogue into which you can explore changes in wind direction and speed. All of it works in real time, slide the slider bar and the results immediately calculate.
Graph Traces
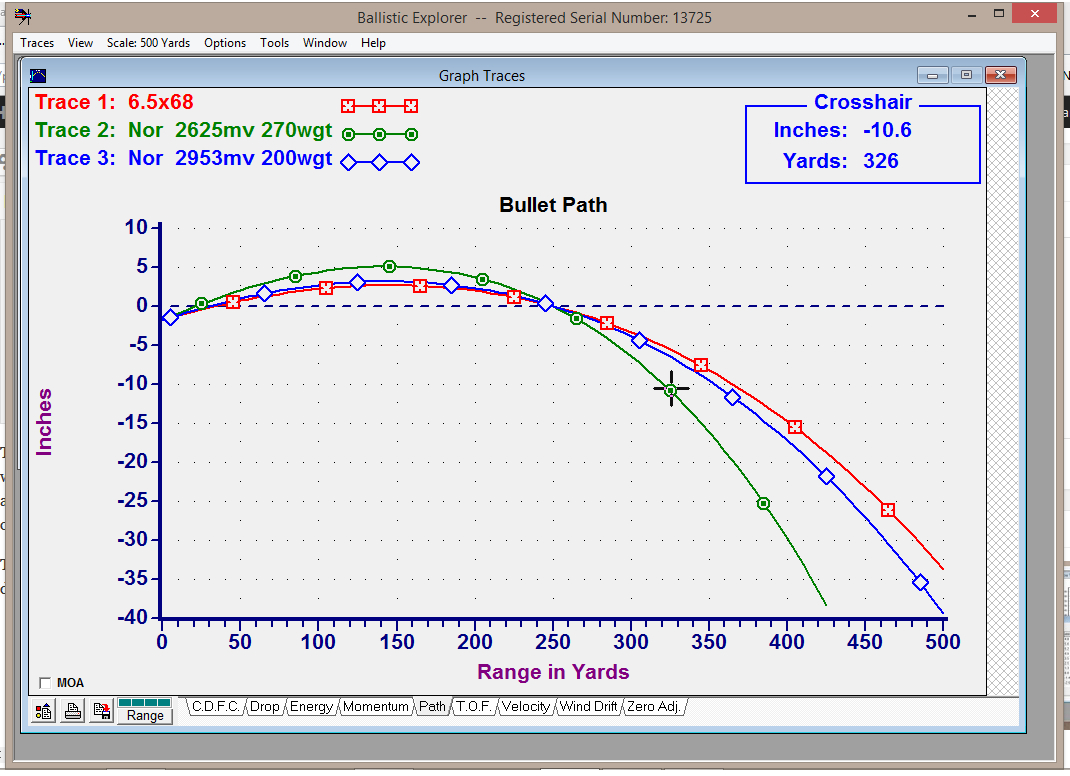
The Graph Traces window does exactly that, it graphs the Traces. One nice feature is that you can click on a trace at any point and it will give you an exact read-out of that result in the top right box. You can see the “crosshairs” clicked on the green Trace line and the result for that in the “Crosshair” box at the top right.
Report Traces
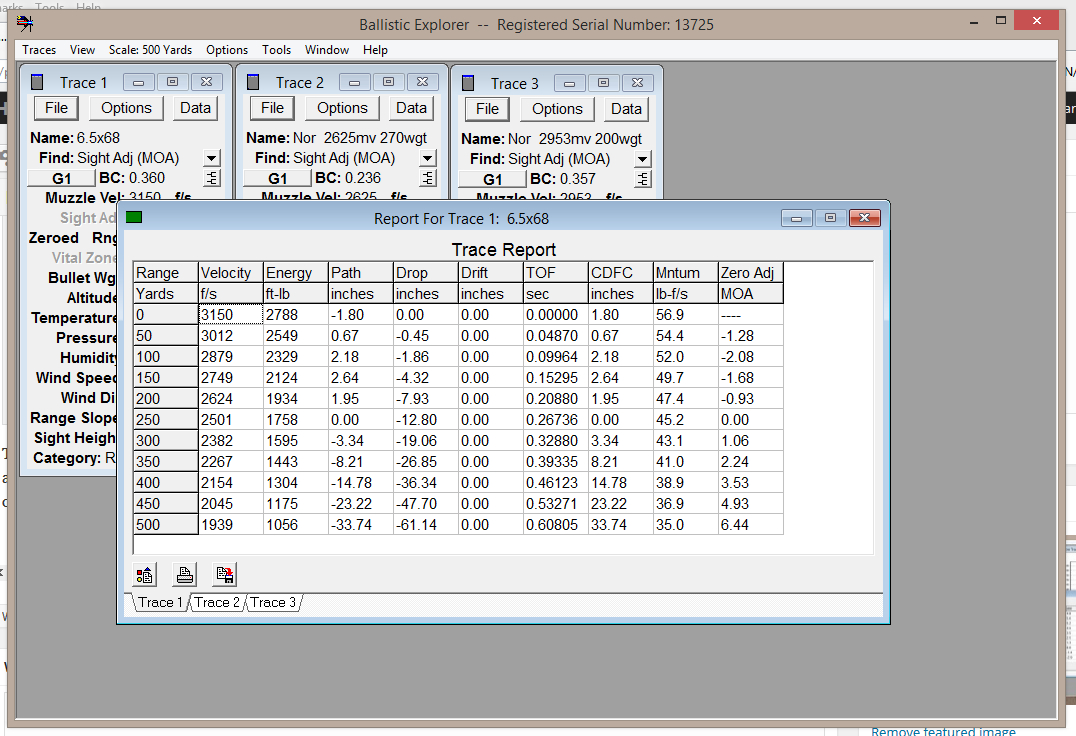
Last but not least is the Report Traces window. The Report Traces window provides a complete summary of your results for each Trace. So you can get a full picture in one convenient eyeful.
The Help System and the Tutorials
Having spent a lot of years both having to learn different pieces of software and teach others how to use them I’ve come to appreciate that no piece of complex software is really going to be accessible unless the authors have gone to the trouble of creating clear and succinct instructions and tutorials so people can learn how the program works and thus begin the process of doing the “seat time” to become fully competent with it, and thus able to fully exploit the software as it was designed to be exploited. Oehler’s Ballistic Explorer has one of the best help and tutorial set-ups I have seen. They use clear diagrams, succinct descriptions and using their help system will get you competent with the program about as quickly as it is possible for a human being to become competent. It really is one of the programs strongest features. The full help and tutorial system can be downloaded as an additional file and installed so it works when you don’t have Internet access which will of course likely be the case when you are at the shooting range or out hunting.
Conclusion
I regard Oehler’s Ballistic Explorer as the nicest piece of external ballistics software I have used. I’d much rather spend my US$80.00 on this than spend a lesser amount on something that just doesn’t quite have all the features or the fabulous Help system. Though it isn’t always true that “in life you get what you pay for”, it is true in this case. What is also a real selling point for me is, as I said in Part 1 of this review, the program has been written by a conservative programmer and as a result it is actually not limited to the Microsoft Windows operating system but can be used on Linux systems using the WINE emulator. I don’t have the means to test it on a Mac using WINE but I would fully expect it to work on that also.
So, thumbs up to Oehler. You’ve created a great piece of software and I think I’ll be using it right up until the time that I “Shuffle off this mortal coil and go to join the choir invisible”.
Jon Branch is the founder and senior editor of Revivaler and has written a significant number of articles for various publications including official Buying Guides for eBay, classic car articles for Hagerty, magazine articles for both the Australian Shooters Journal and the Australian Shooter, and he’s a long time contributor to Silodrome.
Jon has done radio, television, magazine and newspaper interviews on various issues, and has traveled extensively, having lived in Britain, Australia, China and Hong Kong. His travels have taken him to Indonesia, Israel, Italy, Japan and a number of other countries. He has studied the Japanese sword arts and has a long history of involvement in the shooting sports, which has included authoring submissions to government on various firearms related issues and assisting in the design and establishment of shooting ranges.
